Showing posts with label Techique. Show all posts

Thursday, 25 May 2017

Soap Dough–a soap making challenge

Soap Dough Lolly (138)

This is a challenge I was so excited about. It really taught me a new skill and I have new found respect for all cake decorators! The precision and skill that is required is beyond me.

For this challenge I had to call on my best friend Debbie, who is an award winning cake decorator. She has been living in Australia for the last 8 years and we have just reconnected after she moved back here again. What a great way to take up our friendship again. She taught me to mould and shape roses and leaves.
Soap Dough Lolly (91)

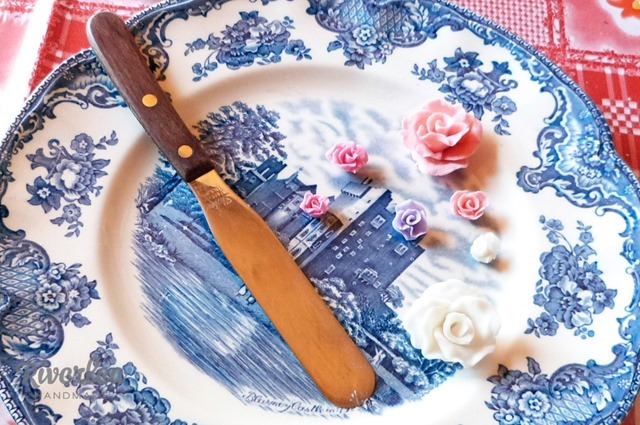
Soap roses and a palette knife

Soap Dough Lolly (94)

Moulding and shaping the soap lolly. This was harder than it looks. I really battled with the uniformity of the top and trying to get the “dipped” soap layer an even thickness was quite a challenge.

Soap Dough Lolly (96)

Debs took the plunge and started to add roses to the lolly i had made while I made the next lolly for me add roses to.

Soap Dough Lolly (61)

As you can see the “chocolate” strip was also quite thick. I was too afraid to roll it thinner as it kept on breaking.

Soap Dough Lolly (71)

Debs did a great job of adding the roses, while mine was much more basic and simple. She clearly has done more of this than me adn has an artistic eye for bunching the roses together.

Soap Dough Lolly (49)

Soap Dough Lolly (135)

Thanks Amy, as always this was a great challenge and I had a lot of fun.


Thursday, 3 March 2016

Making a silicone Liner using Rose’s Box template

P1310418
Rose Ericson, a good friend, from the States, who made my soap cutter and this soap cutter  for me sent me mould maker to test.
She also sent some combs for swirling but more on that soon.P1310367
I took the template apart so I could add putty to the cut in the wood.
DSCN0016DSCN0020
Mixing the silicone as per the manufacturers directions. DSCN0022
See the YouTube video here 
Making Rose's Soap mould (1)-001
#Riverlea soap 


Monday, 17 August 2015

Mantra Marbles - a Soap club challenge entry

   This month Amy Warden from Great Cakes Soapworks set us the challenge of Mantra Marbles.
   This was a fun challenge and I learned a lot about swirling in this technique. Mantra Marbles (37)
We used Peacock Green Mica, Titanium Di Oxide, Shine Red Mica , Peach Pink Mica  and Apple Green Mica. I used the non pareil method and it is fragranced with Neroli Essential oil.
This is Amy's entry, which I think is beautiful.


I had a few attempts at this but I love the colours in this option which was my first attempt.
Mantra Marbles (13)
I will definitely be doing this technique again, thanks Amy
#Riverlea Soap

Monday, 6 July 2015

International sponsorship with Great Cakes Soapworks

Riverlea-Facebook-ad

I am very pleased to announce that Riverlea Soap will be the International sponsor for Great Cakes Soapworks July contest. Amy has graciously allowed me to supply gift vouchers for the winner, second and third place plus the sponsors choice. Thanks so much Amy.

I am so excited to see what lovely entries you all create.

Have fun.

#Riverlea Soap

Friday, 19 June 2015

Ebru Soap - A Soap Challenge entry

This month Amy from Great cakes Soapworks decided on the Ebru technique for our challenge. This was quite difficult actually. It requires the skill of free hand drawing, something I don't have.

Ebru (1)

This was my inspiration for the soap I made but as you can see it did not turn out quite like that. I figured if I chose something really simple that did not require too much drawing I think the thing I noticed most about the differences between the two mediums is the consistency. I think doing this technique with soap is really hard as your soap is setting while you work but with the marbling ingredients they remain fluid all the time.

image

Ebru (4)

I used  a slow moving fragrance and did not put any fragrance in the colours BUT what I found was the base started to set up while I was dragging/ drawing my pattern. I think that I may have had my oils too cold but I was afraid if they were too warm they would set up faster. Decisions, decisions!

Ebru (5)

Despite the difficulties encountered it was a fun technique to try and I will definitely attempt it again. I might have to do a little more research though and see what the other contestants tried.

#Riverlea Soap


Thursday, 18 June 2015

Drop swirl soaps

Drop Swirl 0615-069

I am having so much fun with the drop swirl technique.

You can see my first attempt at it here

The above soaps were made with Peacock green mica, Titanium di oxide, Blue oxide and green oxide.

It is such a fun technique and all your bars are so different.

#Riverlea Soap

Saturday, 16 May 2015

Mini Desserts - a soap club challenge

Mini Desserts - Riverlea Soap-033

I have been a little separated from my blog this year. The best laid plans have gone awry leaving me behind in my posting and I have just not managed to catch up. I will have to spend a good few hours post dating.

Anyway this month we had our challenge from Amy Warden at Great Cakes Soapworks - Mini desserts. I have to admit I was a little intimidated by these tiny suckers! Once I got over that intimidation I had a lot of fun.

Mini Desserts - Riverlea Soap-018

My first desert was Pistachio Dream cake. I used chocolate chips for the base and also added a little chocolate brown oxide to ensure I got a deep chocolaty brown. For the chocolate curl I shaved little of the base off and then piped a "Leaf" onto the top and then pushed the chocolate curl onto this.

Image result for chocolate chips

Mini Desserts - Riverlea Soap-044Mini Desserts - Riverlea Soap-025

Strawberry Mousse Cake: I made this dessert with White chocolate chips and Titanium Di oxide to ensure I got a good white base. I then coloured the base with Red Dayglo and titanium di oxide to get pastel pink. I then piped roses and added leaves with the same green I used on the leaf of the Pistachio cake.   

Mini Desserts - Riverlea Soap-039

Mini Strawberry Cupcake: I did not use any food in this cupcake. I did use the same roses as the Mousse cake and piped the leaf onto in at the end. I started with the base, using red Dayglo, then a day later piped the icing and then added the rose and leaf on the same day.

Mini Desserts - Riverlea Soap-057

Image result for dessicated coconut

Strawberry Meringue Pie: I used Chocolate chips in the base along with desiccated coconut. I then poured pink soap coloured with red dayglo and titanium di oxide onto the base and then piped white soap onto the top. I added coloured jojoba beads  for the sprinkles.

Thanks Amy. This was a lot of fun and not as intimidating as I had initially imagined. i will definitely be making more in the future.

#Riverlea Soap

Tuesday, 3 March 2015

Lacy Soap

P1280171

I saw this tutorial and thought I would try to make the soap. As I already had a mat I was set to go.

I am pretty please with the result. We used Violet Ultra Marine and Titanium Di Oxide.

Next week I will show you how I did it.

#Riverlea Soap

Tuesday, 20 January 2015

Butterfly Swirl - Soap Challenge video tutorial


I have wanted to try  this technique for a VERY long time but Christmas time was a busy period so I did not have any time to play.
I then saw that Amy Warden from Great Cakes Soapworks was offering it as the January Soap club challenge so naturally I signed up.
I used coloured Micas from Kolortek that I purchased in December.
Butterfly swirl 130115-008  Butterfly swirl 130115-009 Butterfly swirl 130115-002  Butterfly swirl 130115-004
Butterfly swirl first attempt


This is the soap cut. I was quite happy with it but had to give it another try.
Butterfly challenge (8)Butterfly challenge (2)Butterfly challenge (10)
I quite like this attempt.
How to create the butterfly swirl
You can see the video above or got to YouTube.

#Riverlea Soap

Monday, 27 October 2014

Making of The “Rose Cutter” Tutorial By Rose D Ericson part 2

This is part 2 of making the Rose Cutter by Rose D Ericson.
You can see part 1 here
Measure across the end (front of the photograph). This is 6cm (½ inch) material. This is the hinge plate. The end of the cutter takes all the pressure of cutting so you have to re-enforce it.
clip_image002
clip_image004
We are ready to add the hardware. My goal in making this cutter was to use anything I could find from the hardware store.
clip_image006
Let's add the wire (there will be another post on how to work with the wire as it is quite an art)
Now we will build the base, measure across both ways. You want the size of the cutter without the handles. This one is 14x16, yours may be different if your bar size differs to mine. Cut a 19mm (¾ inch) piece of plywood this size for the base
clip_image008
Now attach the hinge to the back. It should look like this (below)
clip_image010
clip_image012
Next you need a piece of 12mm (½ inch) stock that is 10.2cm ( 4 inches) wide. Remember we drilled the holes for the eye bolts at ½ inch, here is where this is important, this piece should be 25mm (1 inch) shorter than the inside of the cutter. Here is where you will build your soap pad, where the soap rests. Now remember how thick you are cutting your soap subtract 6mm (¼ of an inch.) You will need to cut, or purchase strips of wood this size. Example if my soap is 1 inch then I need ¾ inch strips, if my soap is 2cm then I would need strips 1.4cm ( I think) cut your strips to 11.5cm ( 4 ½ inches.) You will need 13 of them. Using a spacer ¼ inch thickness create the pad. It should look like this.
clip_image014
Now attach the strips to the pad. Try to make them flush and even on one side. For times sake I used a pinner (nail gun) but the first one I did for Riverlea I screwed down I did one like that so you could see. Use a 6cm (¼ inch) spacer to make them accurate .
Now take 12 cm (½ inch) stock that is 6.5cm (2 ½ inches) wide and make this the same length as your soap pad. Draw a ½ inch line across the bottom. Line up the wood to the back of the pad where you made it flush. Now Mark with a pencil, where the strings will go. It should look like this. (Below)
clip_image016
Straighten up your lines and drill a 6mm (¼ inch) hole at the ½ inch Mark where the lines meet.
clip_image018
I used a scroll saw (jig saw) to remove the wood I just followed the line till I got to the hole I had drilled. You could use a coping saw, a band saw, a dovetail saw, as long as you were careful it will work. Take your time, be accurate.
clip_image020
Now attach to the soap pad. Close the cutter and centre the pad so it is square. Open the cutter and use a tape measure/ set square to ensure you are square. Clamp the upright to the base. Now run a long screw into each corner.
clip_image022
clip_image024

There you have it a completed cutter. If this soap pad/ base looks too hard there are a couple of alternatives that you could try... see below
Make the pad and the back at the same time. This is what I did for my first one for Riverlea.
clip_image026
Or if you want to go even easier instead of a back just use L brackets, (also known as corner brackets or shelf brackets - below)
clip_image028
clip_image030
Here is what it looks like with brackets. The silly part is it works great. I made some soap and did a test, this method works just as good as the wood one I made. Its sole purpose is to keep the soap from sliding while you cut and it works really well and is easy.
Rose Cutter-001 
Perfectly cut, even bars. I LOVE this cutter. Thanks Rose for a very concise tutorial.

As promised here is the information on how to tie the strings 

#Riverlea Soap


Related Posts Plugin for WordPress, Blogger...