Showing posts with label mould. Show all posts

Thursday, 3 March 2016

Making a silicone Liner using Rose’s Box template

P1310418
Rose Ericson, a good friend, from the States, who made my soap cutter and this soap cutter  for me sent me mould maker to test.
She also sent some combs for swirling but more on that soon.P1310367
I took the template apart so I could add putty to the cut in the wood.
DSCN0016DSCN0020
Mixing the silicone as per the manufacturers directions. DSCN0022
See the YouTube video here 
Making Rose's Soap mould (1)-001
#Riverlea soap 


Sunday, 30 March 2014

Making Silicone Mould Liners - A tutorial

Mould Liners Silicone-028

I have wanted silicone liners for my wooden moulds for a very long time as I am so sick of lining them with paper or plastic. No mater how easy it is to line them it still takes time! The only problem is you have to make a box that just fits into your mould leaving a 0.5-0.8cm space around the box so you can pour the silicone in. See this link from Amanda Griffen on how to make a mould. It is an eBook but looks really good. This is a real problem for me as I have quite a few different mould sizes and really did not want to make loads of boxes to fit. Too much work and then wasted wood when I was finished. I had to come up with a clever plan. And I think I did. I hope it helps all you you out there. It takes a little longer to do than the box in a box method. We will make the sides first then make the base afterwards.

You may have seen my other posts on making silicone moulds, here, here, and here.

You will need

Some Silicone to mix up. I used Mould Max 30 from AMT Composites.

A stick to stir it

A small stick like a skewer to fill in the sides

Metal clips/ grips

Silicone liner1   Mould Making-007

Making Liners collage

Make sure you have made the box/ sides that you will pour the silicone into. I used a huge tile and wood clamped together. Measure your moulds to make sure that you make the box the correct size. i.e. if your mould length is 60x10x10 high and you only make the box 50cm it will not be long enough for the longest side.

1 Mix the silicone as per the manufacturers instructions
2 Have your little sticks ready (this will be when you make/ pour the base which is coming later
3 Pour the silicone into the large box you have created and leave it to set, Usually 12-24 hours
4 Once the silicone has set measure and cut the silicone to fit into the sides of your mould as per pic 7
5 Place your mould on a flat, level surface
6 Fill all the cracks with putty to make sure the silicone does not leak out
7 Secure the cut pieces onto your mould - I used metal clips/ grips
8 Once all the sides and ends are cut and secure mix up a new batch of silicone, enough to fill the base of the mould. I made all my sides and base .6cm thick. Take your little stick and get a blob of silicone, slide it along the sides/ corners where the two pieces of silicone meet making sure there is enough to stick the sides to each other but not too much that it runs down and pools the the base. Work quickly as your silicone is setting up. See the picture below of the corner
9 Pour the silicone into the base of the mould making sure the it is evenly distributed and has no bubbles
10 I used a stick to spread it and make sure it went into the corners
11 Go back to the corners and if you need to re apply more silicone do it now while the silicone is still fluid
12 Wait for the silicone to set up and you can pull it out of the mould. It will be a perfect fit when you put it back.

If the corners are not adequately stuck then the next time you mix silicone just reapply to the corners.

This is not as neat and perfect as the box method but I prefer it (because I came up with the idea ha ha) because it saves me having to make the boxes to fit inside the moulds which would take time and money.

Mould Liners Silicone-030    Mould Liners Silicone-031

That is it - easy peesy. I have now done all my moulds and I will never have to line them again - YAY! I hope this makes sense and helps you all out there.

#Riverlea Soap

Monday, 3 February 2014

How to use the easiest mould

My last post was about making a very easy mould. This week I will show you that it was not only easy to make but also very easy to use.

Easy Wooden mould-010

Take all the pieces and wrap them in plastic, taping them at the back. Once you have done that assemble the mould and there you have it - ready to use.

In this very short video you can see all the pieces of wood wrapped in plastic. To unmould the soap you simply slide each piece of wood off the soap block.

Using the easy mould

Monday, 13 January 2014

Easiest Mould in the history of Mould making - A tutorial

Easy Wooden mould  

As a soap-maker who makes a lot of soap I am always on the hunt for an easy mould to use that is quick to line and can come apart to be packed way, therefore not taking up too much space. In December I was given some wood that is used for making cupboards so I thought I would use this for making a mould.

Easy Wooden mould-001   Easy Wooden mould-002

TOOLS:

  • Drill
  • Screw diver
  • Thread bar, washers and wing nuts
  • Hacksaw
  • Nail and hammer

METHOD:

  • Make a box out of all the pieces with the base sitting flat and all the sides on the outside of the base piece.
  • The two longest sides should overlap the two shorter sides.

Easy Wooden mould-007   Easy Wooden mould-003     

  • Take your washer and use it to measure where you want your holes to be on the two longest pieces and how big your hole should be. See the top picture.

Easy Wooden mould-004   Easy Wooden mould-005

  • Use the nail to make a small indentation to stop the drill bit from slipping on the shiny wood and then drill your holes. You will drill each end of the longer pieces only as this is where the thread bar will feed though.

Easy Wooden mould-006   Easy Wooden mould-008

  • Take your thread bar and measure how long you need to make it. i.e. make sure it will feed through the holes and you still have enough space to thread the wing nuts on. See the top picture. Using the hacksaw cut the thread bar to the correct length. You will need two cut pieces - one for each side of the mould.
  • Assemble the mould by making the box as per top picture and threading the bars though the holes. Place the washers onto the bars then the wing nuts and screw them tight.

Easy Wooden mould-010

That is it. Easy mould to make and hopefully use. it neatly flat packs away.Next week I will show you how I line and use it.

Pin It!

#Riverlea Soap


Monday, 8 April 2013

Pumpkin festival - What fun

Yesterday was the annual pumpkin festival in our area and as you can see there were a lot of fun entries. Mine is the tiny one on top of the VERY large one. I cheated a bit because mine is actually a SOAP. But hey they didn't specify that it had to be edible!

pumpkin market 027.R. JPG

See here how I made the soap:

I decided to make a a mould for my pumpkin soap as I did not have time to search for one. I used a plastic pumpkin that I had bought last year for a photo prop. I am glad it came in handy again.

I used a different product to make my mould this time. It is something called Flexy Fast moulding putty and you can buy it from Bramble berry. I have to say it is not the easiest stuff to work with and OMG is it sticky. I think I read somewhere that I should not use silicone gloves. So with this in mind I used silicone gloves. What a mess.

DSCN0001 (2)DSCN0001 (3)DSCN0002 (3)

The cute little pumpkin that I based my mould on. Mixing part A and part B
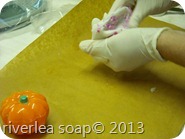
DSCN0003 (2)DSCN0006 (2)DSCN0008 (2)

Mixing and mixing then realising it was really sticking to the gloves.

DSCN0009 (2)DSCN0010 (2)DSCN0011 (2)

No way was I going to waste it so I took an old knife and scraped it all off the gloves.

DSCN0014 (2)DSCN0015 (2)DSCN0016 (2)

The knife worked so well I decided to use it to mix with, so I scraped it all onto a piece of brown paper and mixed away. Much easier.

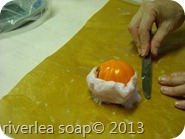
DSCN0017 (2)DSCN0020 (2)DSCN0021 (2)

I then used the knife to spread it onto the plastic pumpkin and then I moulded it so it was evenly distributed.

DSCN0001 (7)DSCN0022 (2)DSCN0023 (2)

I left a hole at the top - which would be the bottom of the pumpkin when made up.

P1250588

I have to say this was fun but pretty messy. I am sure I probably did something wrong - hence the mess. But all's well that ends well.

You can also see my other mould making escapades here, here and here. There are also some textured moulds here 

Pin It!

Riverlea Soap

Related Posts Plugin for WordPress, Blogger...